Running Wordpress on Docker [Simple] 2 Part Guide
Goal:
In this how-to, we are going to learn how to set up a new wordpress docker project from scratch. This will be useful for anyone who is looking to build a new wordpress site from new or simply run an existing wordpress site locally in a development environment.
Prerequisites:
Wordpress requirements
To run wordpress in a local environment(or any environment), we must first workout what wordpress needs to run.
This can be simply broken down into the following requirements :
- Web Server (Apache or Nginx, to serve request to and from the application)
- Php (To run application code)
- Mysql (to store data)
Part One - New Wordpress Site
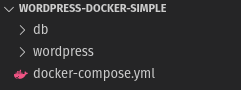
Step 1. Creating our basic folder structure
wordpress-docker-folder:
- File: docker-compose.yml
- Folder: wordpress
[this will host all our files in order to run a wordpress site] - Folder: db
[this will hosted all the auto-generated files & folders that mysql creates when it is installed]
Step 2. Add required services that we need in order to run wordpress
This can be based on the list of requirements we worked out at the start (web server, programming language / compiler, database).
As this is a simple starter guide to running wordpress using docker, we will be using pre-configured docker images that Wordpress.org has officially released : https://hub.docker.com/_/wordpress
From this default configuration file, we can see there are two services ‘worpdress’ & ‘db’. Effectively these will be the two containers that we need to run our website. Both of these containers are built based on images. These images are basically a blueprint of commands that install all the required dependencies.
Here is a brief break down of each image:
Wordpress:
- This image installs apache (webserver), php + php extension ( like php-mysql ), and also downloads a fresh install of wordpress (Only if it detects that there is no pre-existing installation in the ./wordpress directory ).
Mysql:5.7
- This image installs all required dependencies to run mysql-server. You may have noticed that this image also has a tag attached to it ‘:5.7’, this is an indication of which version of mysql you want to run, in this instance it is version 5.7. This is a docker feature that can be used on any docker image, however do note that you will need to check with the maintainer of the image as to the format of the tag. This usually can be found by visiting the official docker hub page for the image e.g. for mysql : https://hub.docker.com/_/mysql
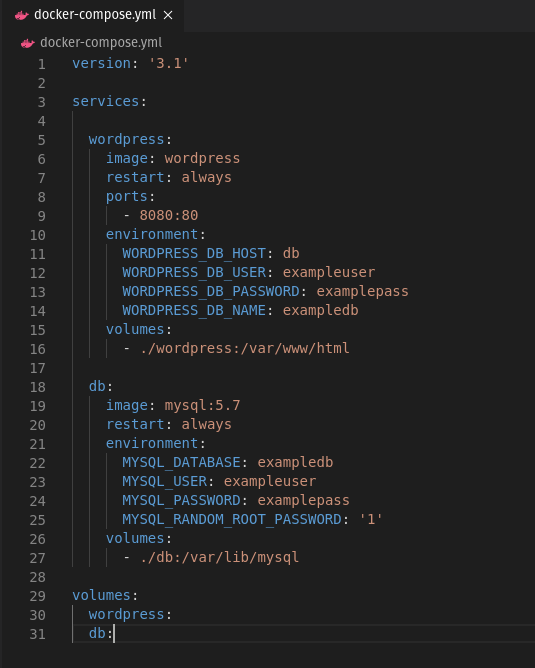
Step 3. Linking our local folders to the virtual volumes
Before we create and run our containers for the first time, we will need to make a slight adjustment to our docker-compose.yml configuration. This slight change will allow us to link our virtual docker volumes to folders within our project.
For both services make the respective changes:
Wordpress:
- ‘wordpress:/var/www/html’ => ‘./wordpress:/var/www/html’
Mysql:
- ‘db:/var/lib/mysql’ => ‘./db:/var/lib/mysql’
Step 4. Running our default configuration
As we are going to be using the default wordpress docker-compose.yml file, there will be little to no further configuration to creating and running a new wordpress site locally.
To run the docker-compose configuration, type ‘docker-compose up’ in your terminal. Make sure that your terminal is in the same directory as your project & docker-compose file.

As this will be your first time running these images / containers, docker will have to download all the required images in order to build the containers. These images once downloaded, are stored locally and can be used again and again. So if you feel that this might not be as fast as you were expecting, don’t worry this is just a once off.
Step 5. Testing your local wordpress site
After running the ‘docker-compose up’, you will have noticed that both folders (‘wordpress’ and ‘db’) were populated with files and folders. This is done automatically by the commands inside both wordpress & mysql images.
To view your local wordpress site, visit http://localhost:8080/
Once visiting localhost, you should be prompted with the ‘Wordpress Installation’ screen. This means that you have successfully created all the docker containers in order to run wordpress locally. Congratulations!
Part 1 - Video Tutorial Can be Found Here:
Part Two - Running An Existing Wordpress Site
*Note: we will be skipping a few steps as they were already covered in Part One. This section will be continuing off from Step 3 - Part One.
If you completed all steps from Part One, before attempting the following, you will need to do some cleaning up. This will prevent the previously generated files from causing any issuses.
- Run ‘docker-compose down –volumes’
- Remove all items in both ‘./wordpress’ & ‘./db’
In order to run an existing wordpress site in our local environment, we will need two things. A database export, and wp-content’s folder from the site we want to run locally.
Step 1. Allow mysql to build database based off an .sql file
Under the volumes for the mysql service add ‘- ./schema/:/docker-entrypoint-initdb.d’

Now that we have added this line, we will need to create a folder called ‘schema’ in our project and copy our .sql file into it.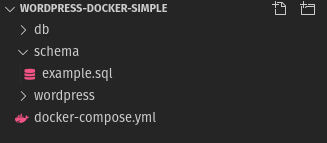
Step 2. Copying over our wp-content folder
Our project should already have a ‘wordpress’ folder. Make sure it is empty. Copy across the wp-content folder that you gathered from your live site.
Step 3. Running the docker-compose config
Now that all our required content from our live site is in our project, we can run our containers.
Run ‘docker-compose up’.
Visiting http://localhost:8080/ should now show us our local instance of our existing site.
However, if this does not show you your existing site, there may be issues with php, and wordpress versions. If this is the case you will need to further customise your docker instance, or update your existing site to the latest versions before trying to import it into this local environment. Note this can cause issues with old themes & plugins, I will be releasing a future guide on how to customise your local docker instance to run older sites.
Part 2 - Video Tutorial Can be Found Here:
Q&A’s
Q: What happens when you ‘ctrl + c’ the terminal that docker is running in?
- A: This will stop the containers, and effectively ‘turns off’ the wordpress local instance. Don’t worry though, as by simply running the ‘docker-compose up’ command again will start the containers again from the point you left them at.
Q: How do I completely remove these containers?
- A: If you want to completely remove these containers, simply run the command ‘docker-compose down –volumes’ inside your project directory. This will first stop the containers, and then remove the virtual volumes those containers lived in. This is used if you want to rebuild the containers from new again.
Q: How do docker volumes work?
- A: Docker volumes are by default virtual directories that you do not have direct access to. However, these virtual volumes can be linked or ‘symlinked’ to folders with-in your project / repo. An example of this are the wordpress & db folders. The reason for linking these folders to the virtual volumes is to persist any changes that are created / made while the containers are running. If the containers are then stopped and removed, all these changes will still exist in the symlinked folders. This also means that you can make live changes to the local wordpress site - obviously a must when doing local development.